The NBI Clearance online appointment website is a convenient, easy-to-use, secure, and user-friendly platform that allows the public to take the first step to securing the identification document offered by the bureau. Whether you are visiting an NBI office for the first time or you are renewing your NBI Clearance for the nth time, a confirmed online appointment is, and will always be, an integral part of the process.
In this guide, we will walk you through the requirements and procedures on how to secure an NBI Clearance online appointment via the official website. This will include tips and reminders, as well as the most common questions and answers that you can use as reference to make the process as easy as possible.
What is an NBI Clearance Online Appointment
An NBI Clearance Online Appointment is an appointment process where you use the NBI-designated website to choose the branch, date, and time to process an NBI Clearance application. With the online appointment, you are guaranteed a slot at the NBI office of your choosing.
Like any other online application, securing an NBI clearance online appointment will require you to input your essential personal information, including your name, gender, address, and place of birth. Having said that, doing so allows you to also get your information filed in advance so you will only need to get your biometrics, digital signature, and photo taken on-site. Needless to say, a confirmed NBI appointment online makes the process of acquiring a clearance easier and so much more seamless.
Securing an NBI Clearance Online Appointment
The National Bureau of Investigation has made effective the “No Appointment, No Entry” policy for those applying for NBI Clearance. This means that you need an online appointment before you can apply and make your personal appearance at the NBI Clearance center. Thus, it is strongly advised to register online and set an appointment date in advance.
Securing an NBI Clearance online appointment is a simple process, however, it requires a few things before the process can be initiated.
Requirements
To start, you need:
- A personal email address or one you are officially using as the confirmation of the appointment as well as the billing/payment information will be sent there.
- A stable Internet connection
- A computer or any digital computing device
- An NBI clearance online account (if available, otherwise, you need to register for an account first)
Aside from these, you also need the following:
- Two (2) of any of the following original, visible, and valid ID cards
- Passport
- Philippine National ID Card/PhilSys ID
- Alien Certificate of Registration (ACR)
- Senior Citizen ID Card
- OFW ID card
- National ID card
- Senior Citizen ID Card
- Vote’s ID
- PWD ID card
- PSA birth certificate
- Driving license
- PhilHealth ID
- Single parent ID
- Tax ID
- Postal ID
- Certificate from the local civil registrar
- Company ID of government employee
- Police clearance
- Solo parent ID
- Voter’s ID
- PRC License
- Pag-IBIG ID
- UMID (SSS plus GSIS)
- MARINA ID
- School ID card
- Seaman’s book
- Malacanang certificate for indigenous groups
- Police clearance
- Barangay certificate (if you’re a first-time job applicant)
- Oath of Undertaking (if you’re a first-time job applicant)
- Active and valid email address
Setting an NBI appointment for an NBI Clearance Application Online
Once you have prepared the requirements, you may start with the following steps on how to schedule your NBI Appointment using the bureau’s official website clearance.nbi.gov.ph.
Step 1: Visit the NBI Clearance website at https://clearance.nbi.gov.ph/.
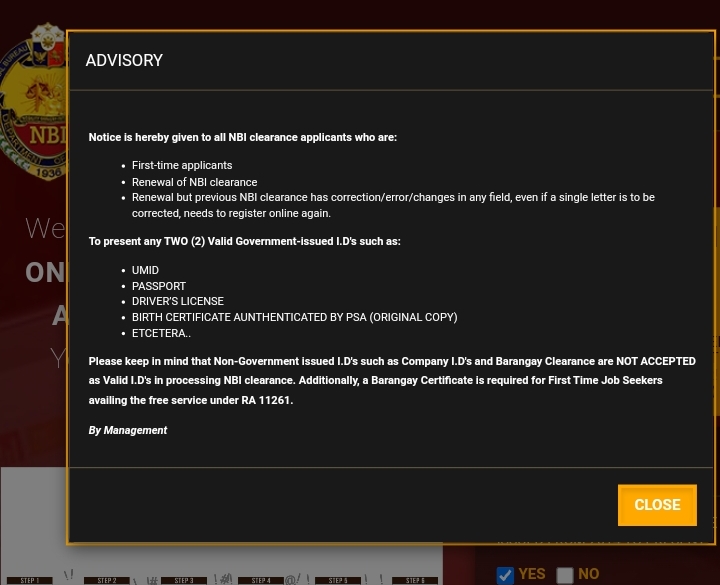
Step 2: Click “I Agree” to agree to the terms of the Data Privacy Content of the site.

Step 3: When the pop-up changes to Advisory, click “Close” to proceed.
Step 4: Log into your NBI Clearance Online Account using your registered email address and password, then click “Sign In.”
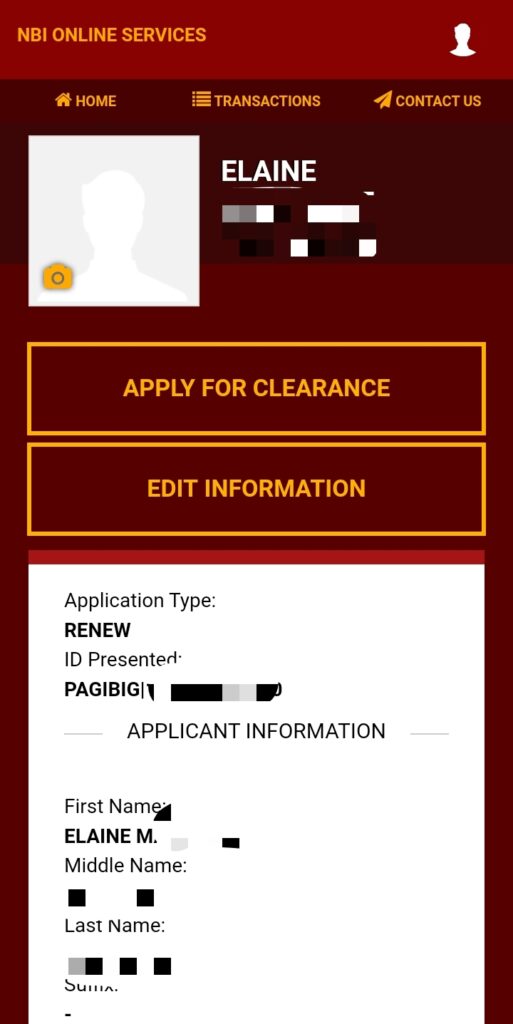
Step 5: In the section that says “edit applicant information,” enter your personal information in the required form columns.
Step 6: Confirm accuracy then click “Save Information” or “Submit” once done.
Step 7: Click “Apply for clearance.”
Step 8: Update your identification information when the small pop up window asking for your Valid ID by choosing your ID type and uploading valid ID card information.
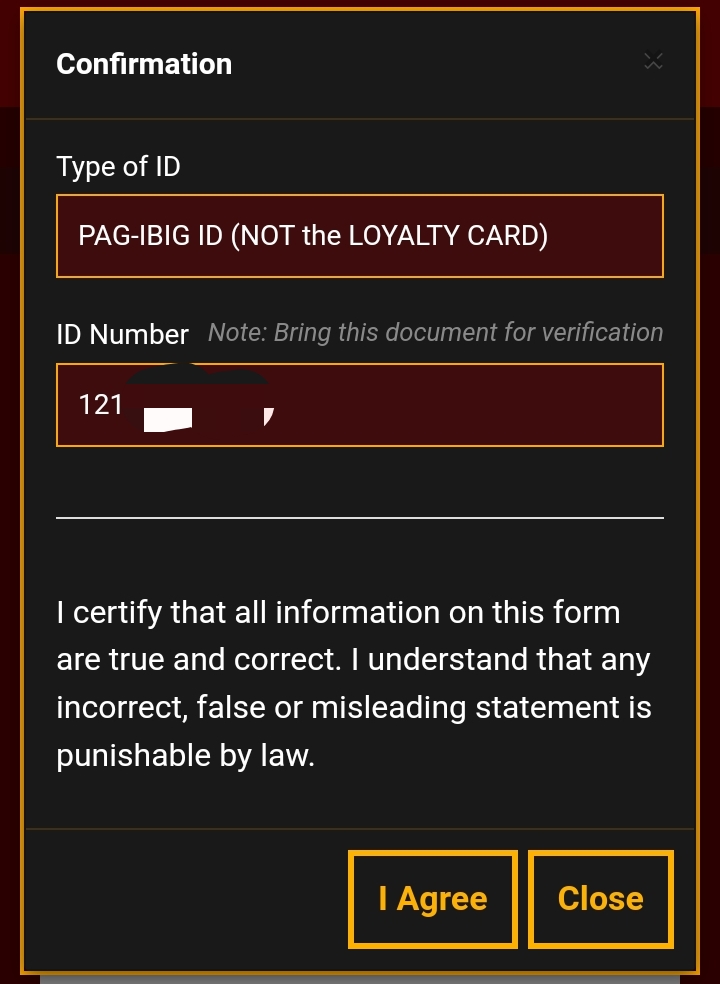
Step 9: Click “I Agree.”
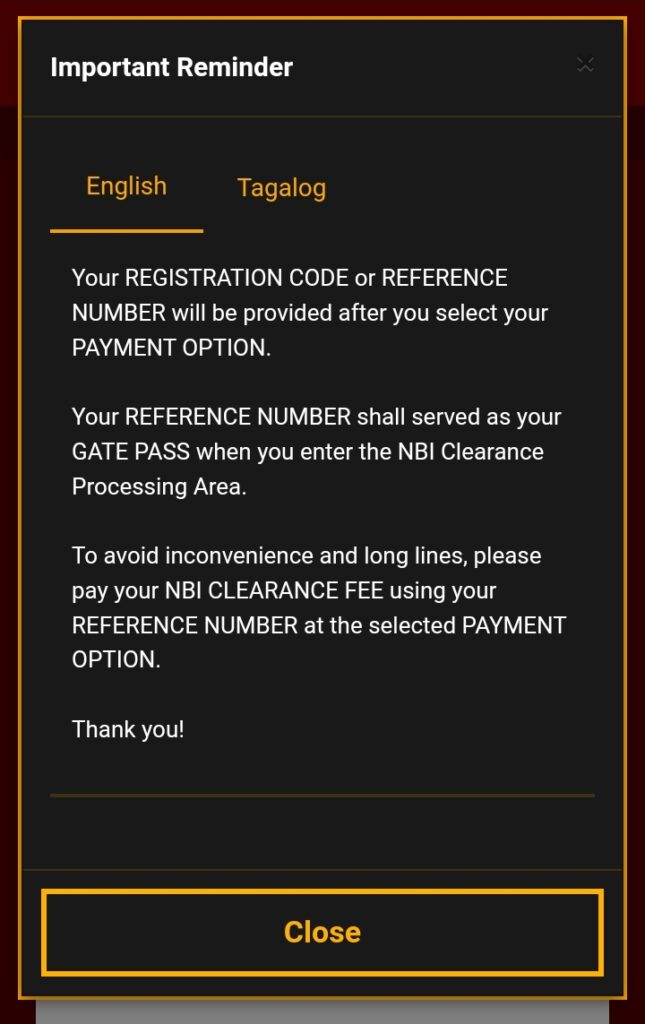
Step 10: When you see the pop-up window with a reminder, click “Close.”
Step 11: From the drop-down menu, choose the NBI clearance center that is near and convenient for you.
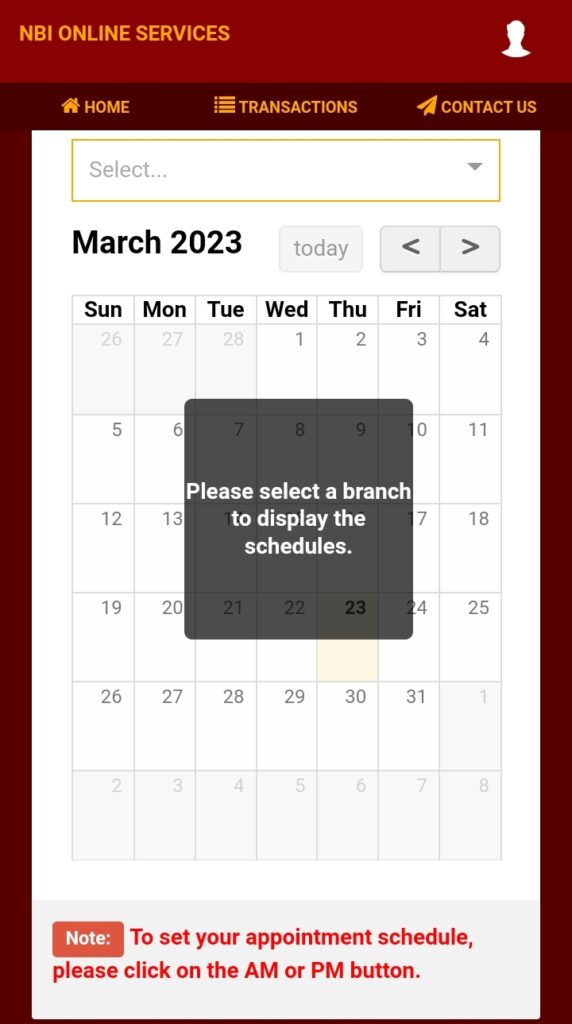
Step 12: Click on the AM or PM button then choose the time and date of appointment that best fits your schedule.
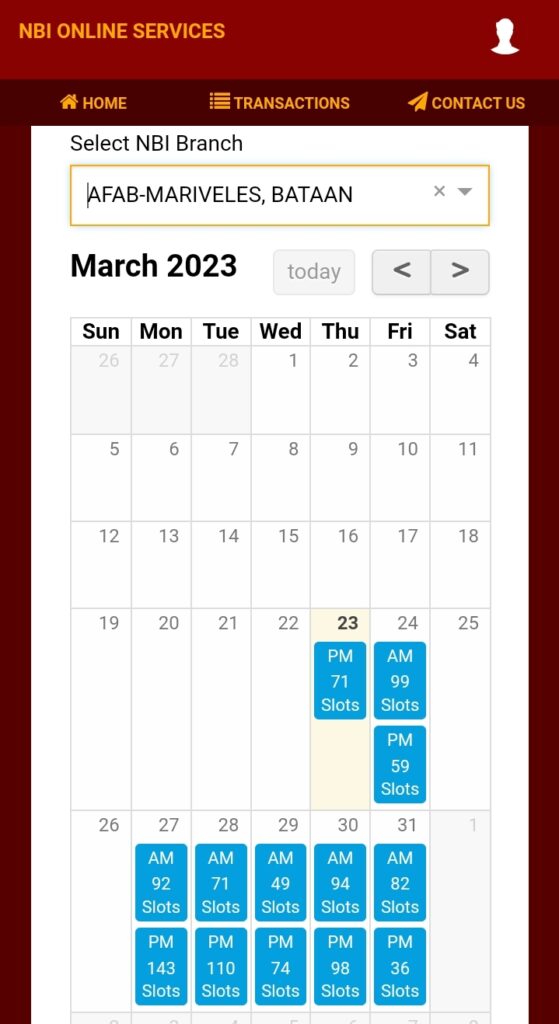
Note: In the selector calendar, the boxes in blue are available slots while the red ones are either Holiday or the dates when the NBI Branch is closed.
Step 13: Scroll to the bottom of the page and select your preferred payment method from the list, then click “Proceed.”
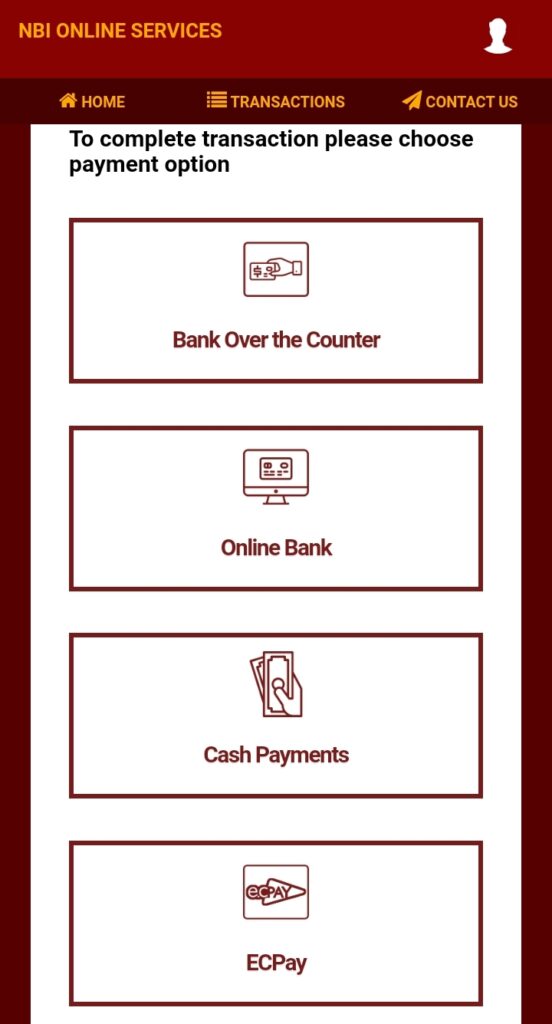
- Over-the-counter cash payment in any bank.
- Online through BPI and Unionbank EON
- Bayad Centre or Partner outlets like Villarica Pawnshop, SM Savemore, and MLhuillier
- Bayad Centre Mobile app
- ECPay partners like Petron Corporation
- All 7-eleven branches
- Mastercard or VISA debit card
- GCash app
Step 14: Print the payment form and pay your clearance dues amounting to ₱130.00 for the clearance and an additional ₱25.00 as the transaction fee for a total of ₱155.00, then click “Proceed to Payment.”
Step 15: Take note of the reference number and the total amount you need to pay. You will receive an email confirmation once your payment has posted.
Important Reminders
When securing an NBI Clearance online appointment, here are some things you need to remember:
- You need to take note of your NBI Reference Number for when you are paying for your NBI Clearance Online Application.
- You also need your NBI Reference number when you visit the NBI Clearance Center as this will be also asked by the staff when you visit to process your NBI Clearance.
- Keep a screenshot of your receipt for your visit.
- NBI cannot process NBI Clearance application through an authorized representative because they need to take the latest photo and biometric information in their database.
Video: How to Secure an NBI Appointment Online
If you need a more vivid walkthrough on how to set up an NBI Clearance appointment online, you may watch this Youtube video from Pinoy Tutorials:
Frequently Asked Questions (FAQs)
For your reference, here are some common questions and answers about setting up an NBI Clearance online appointment:
1. Is there any difference if it’s my first time to schedule an NBI Appointment online or not?
Yes. If it is your first time to schedule an appointment with NBI, this means you do not have an NBI online account just yet. Having said that, you will then be required to register an account as it is a must when setting up an online appointment or applying or renewing for an NBI clearance.
2. Can I go to an NBI clearance center without an appointment?
No. Anyone who wish to visit an NBI Clearance center to either apply or renew their NBI Clearance needs to secure an NBI online appointment in advance and register the information successfully. NBI does not entertain any person with no online appointment unless they have applied from abroad.
3. What will happen if I miss my NBI appointment?
It depends on whether you have already made payments or not. If you already applied NBI online appointment but have not paid yet, then the appointment will be canceled automatically. If you have already paid for the NBI Clearance but failed to make it in your appointment date, you still have up to 15 days after the original appointment date as your grace period and you may go and visit your selected NBI office or clearance center up until then. Beyond the fifteen (15) days, your application and payment will be automatically forfeited.
4. Can I reschedule my NBI clearance appointment?
No. You cannot change the appointment date once you have paid for the NBI online appointment. But if you haven’t made any payments yet, you may simply secure another NBI online appointment and pay for it.
5. Does NBI appointment expire?
Yes. Your NBI appointment, when paid, is only valid up until fifteen (15) days after the original date of your NBI online appointment.
6. Can I go to NBI earlier than my appointment date?
No. The NBI no longer entertain walk-ins. That said, you may only go to the NBI branch to apply or renew your NBI Clearance within the date of your appointment.
7. Can I cancel my NBI online appointment?
No. If you apply for an NBI online appointment successfully and have already made a payment, no. But, if no payment has been made yet, then it will be automatically get canceled.
8. Can I refund my payment for NBI clearance appointment?
No. NBI doesn’t give refunds especially for those paid after making an NBI online appointment. But you can try to reach out to the NBI clearance office to negotiate and see if it can still be refunded by calling 09179999421 or 09204129999. You may also check with the NBI office or clearance centers by checking out this List of NBI Clearance offices nationwide.
Summary
That sums up everything you need to know about setting up an NBI Clearance online appointment via the official NBI site. As you can see, you don’t really need to spend so much effort in setting up one and it will also make applying for an NBI Clearance so much easier. So, when you or someone you know need help on how you can schedule an NBI Appointment, you may simply check out this guide and get started.